Sunday, October 12, 2014

DIY: Hair Lightener!

One of my favorite things is DIY projects! I love making my own face and hair masks and trying out new ideas that I can easily make with the ingredients found around my house instead of paying money to buy some at the store. It is so much better for your hair and cheaper to make your own! So I have been trying for a while to grow my hair out. I went over two years without cutting my hair in hopes that it would grow out longer. BIG MISTAKE! After the first year my hair had grown very little because I would put heat on my hair everyday. I realized how dead my hair was and decided instead of doing the smart thing, cutting my hair, I would just cut out using heat on my hair. Now don't get me wrong that was a smart move! Not using heat has made my hair much healthier but, I still needed a cut! Finally after another almost year and a half, I cut it. I cut off about two to three inches. Now I am doing everything to make sure I don't damage my hair and I keep it healthy and continue to get trims fairly regularly.

Now I have very dark brown hair and I really want to lighten it! Dying your hair is awful for your hair! I'm not saying you should never do it, if your hair is healthy and you want a change, there is nothing wrong with adding color to your hair as long as you care for it properly after. After I cut my hair I did not want to do anything that could potentially damage it until I grew it out just a little longer. I decided to look into ways to naturally lighten my hair. The thing about DIY hair treatments is many don't work or they barley work and only a few people have luck with them. I tried to find a DIY that would work to lighten my hair and I found one that works pretty well. So this is my DIY to naturally lighten your hair. Enjoy! :)

Ingredients:

  • Chamomile Tea
  • 1 Teaspoon Honey
  • 2 Teaspoons Coconut Oil 
  • 2 Tablespoons Lemon Juice
  • 1 1/2 Teaspoons Cinnamon
  • Optional Olive Oil (This isn't to lighten but it is good to keep your hair soft and prevent it drying out)


The first thing you will need to do is brew your tea and let it steep for around five to ten minutes. After your tea is finished, pour the tea in to an empty spray bottle about half way or even a little more if you have enough. Next add the honey, coconut oil, lemon juice, cinnamon, and optional olive oil if desired. After you have everything in, place the lid back on and shake to mix the ingredients. Once everything is mixed, on second or even third day hair, dampen your hair and brush out before even distributing the spray throughout your hair. Then go soak up some sun! The lemon juice acts as an amazing hair lightener but only if activated by the sun. Stay out in the sun for a bit but I don't suggest more than an hour and a half and then just wash your hair! I did this once a week for about a month and saw results! I would just say to do it between once and twice a week until you see a difference. The darker your hair is the longer it will take to see much results, but like I said I had very dark hair and saw results in about a month. Give it a try and let me know your results! I hope you guys enjoyed and let me know what you think or if you have any requests! Thanks for reading!
Until next time, stay lovely!
-Montana Sky XOXO

Tuesday, August 19, 2014

August Review!

Hey guys! Today I want to start something new. Once a month I want to start writing reviews on 3 different products each month. I won't have a set day but I will post once a month. I love trying new products so now I'm going to start writing reviews. These reviews could be about anything. Hair tools/ products, makeup, fake nails, anything I decided to try. These will just be three products I tried that month so some will be positive reviews and some will be negative. If you have anything you would like me to try, leave me a comment and I would love try your guy's suggestions!


Product #1

  • Naked: 3 by Urban Decay
I first tried this product for my brothers wedding. I wore "Nooner" as the base and put "Liar" on over the bottom part of my eye lid. Now first off I'm going to address the brushes. I love the brushes! It comes with a double sided brush and it is the softest brush I have ever used! I love the way it feels when I put it on. Now moving on to the colors, they are gorgeous! You have so many possibilities with the pallet. You could do anything from a sweet innocent look to a little bit more of an edgier look with black heart, darkside, and mugshot. This is an amazing product and I love it! Now lets continue on to what I don't like about it. This product is really pretty expensive in my opinion, for eye shadow. It's about $55.00. As I have said in previous posts, I refuse to pay a lot of money for any products so to me this is wayyy too much! The only reason I tried it was because it was my moms so I borrowed it from her. While I do love this product, I'm not too sure its worth the money although I would possibly consider purchasing it if it where to be on sell because I did thoroughly enjoy this product.
My makeup with the colors "Nooner" and "Liar".


Product #2

  • Clearasil
You may have seen those commercials with the kid that breaks out and says they need something that works fast to which the other person responds with "Clearasil's fast". The commercial goes on to explain how fast Clearasil is. The bottle says "Rapid action, visibly clearer skin in as fast as 12 hours". Now I never expect something to work overnight but I was hopeful I'd see results in maybe a week, especially because they say that it works so "fast".  I tried the product and saw no results. I gave the product a chance and used the entire thing anyways. It made no difference in my acne at all. I got surgery on my jaw for my sleep apnea and I was told not to wash my face but only pat it down with water. After about 2 weeks I could use soap and water once the stitches were out. I had to give them another week to heal before moving on to any kind of facial wash. Because of all this I was breaking out like crazy! It was awful! My chin was covered with painful acne and along with the sides of my nose. I was hoping that the Clearasil that I had left would help but after a week I had no results. I still had pretty bad acne. Every ones face is different so I don't want to say it completely does not work, but for me it did not make a difference and I would not recommend it. The only thing I did like about it was the smell, (I smell everything lol!)but obviously that's not an incentive to buy it. It wasn't a bad price, I got it from Walmart for about $8-$10 but I would not purchase it again.

Product #3


  • Vitamin E Oil
So normally I wouldn't really review a product like this but I wanted to talk about this one. So going back to my surgery, I had stitches on both cheeks, leaving a small mark on both sides. These marks basically looked like blemishes left from a pimple. While I can cover it with makeup, I still wanted to get rid of them. For the first 2-3 weeks after I could only use Neosporin so I would not get infected but, after this time period was over I would wash my face, apply Neosporin, and wait a few minutes before applying a little bit of vitamin E oil. Literally overnight, I noticed a HUGE difference. It helps so much with scaring! I would definitely recommend trying this. I was surprised it did not brake me out because that was my biggest concern. I really liked this product and saw significant results! It;s not just for the face, but for any place that you are experiencing any scaring!  
I hope you guys enjoyed my first montly review! If you did be sure to leave a comment/ suggestion for next month! Suggestions and feedback are always welcome and appreciated! Thanks for reading!
Until next time, stay lovely!
-Montana Sky XOXO

Sunday, August 3, 2014

The Many Uses of: Vaseline

Hey guys! Today I want to talk about Vaseline. I absolutely love Vaseline. It has so many uses and it is so cheap! You can buy a jar of it anywhere from $2-$5 and it lasts forever! I have a 7.5 ounce jar of rich conditioning cocoa butter Vaseline for about $4 from Walmart. It smells amazing and seriously has so many uses! I use it a lot when doing my makeup and at night. I have a list of its many uses, that I find helpful, broken down in to categories. I hope you enjoy it and find this helpful!

Makeup 


  • Makeup remover- Usually when I take off my makeup I wash my face with acne wash and then I either use a cold cream or Vaseline to remove my makeup. They are both cheap and work just as well as makeup remover. 
  • Longer lashes- I have extremely short eyelashes so I have tried everything to make my lashes look longer. One day I read online about using Vaseline so I thought why not? And it works amazing! At night before I go to bed I wash my face and make sure to get all my makeup off. I then take a brush (I just saved one fro an old mascara and washed it and now I use it for this.) Take the brush and dip it lightly in the Vaseline. I then spread it evenly across my lashes, applying it as I would with mascara. The next morning I l put my mascara on normally and my lashes look so long! I've also read that over time it can make your lashes grow but I haven't noticed any growth in my lashes.  You could even use the Vaseline as a clear mascara for longer, natural looking lashes. 
  • Fake eyelash remover- One last thing you can use Vaseline for on your eyelashes is to use is to take off fake eyelashes. I've always heard this works but because I do not wear fake eyelashes, I would not swear by it.
  • Shimmery eyes- Vaseline looks amazing with eye shadow if you do it right. If you add just a little to your  eyelid and rub it in, the boom! You have a primer! Once you apply your eye shadow, it will look shimery.
  • Smeared makeup- When I get home from school I always rub my eyes and end up smearing my makeup but then if a friend texts me to hangout I'm a mess! I always use Vaseline to clean up! I take a cuetip to clean smeared makeup and to touch up.
  • Eyebrows-  Messy and/or thick eyebrows are a pain! You can buy brow gel which will work just as well or you could just dip a brow brush in it and gently comb over your brows for an instant fix!

Dryness


  • Moisturizer- Vaseline works great as a moisturizer, just add a little to your dry knees/elbows/heels and it helps so much!
  • Chapped lips- I put on a little before bed and it helps so much! I also wear it before I put on lipstick and it prevents drying as well as helping the lipstick to stay on.
  • Bloody noses- I recently had surgery on my jaw about 3 weeks ago and needed to have a breathing tube put in during the surgery.  When this was done they cut my nose and for the first two- two and a half weeks I was getting massive bloody noses. The first week and a half was awful! My nose would be pouring blood and I would be choking on it because of how badly it was bleeding. I started adding Vaseline a couple of times a day and they began occurring much less frequent. My nose was dry and it couldn't heal but the Vaseline made it much better. It helped a lot and when it was a smaller nose bleed, if I applied it right away it would usually stop.
  • After shaving- After shaving if you have sensitive skin, you can apply a little bit of Vaseline and this can prevent irritation due to shaving. (I find this especially helpful on my armpits, gross I know, but it really does help!)

Hair

So I only have one tip for this category but I find it sooo helpful! Vaseline is great for hiding split ends. I only do this when I straighten my hair because I find that on my hair, it really only looks good on straight hair. All you need to do is get a little on the tip of your fingers and add it to the tips of your hair. You don't want to use too much or your hair could come out looking greasy. A little goes a long way! Doing this will make your hair loook shiny, sleek, and healthier!

That is all the tips I have for today but, there are so many more! These are the main things I use it for but maybe one day I will write a part 2 that will be written as more of a list? Not sure yet but let me know what you think! Next week is my brothers wedding so I'll write a short post about my outfit, hair, and makeup when I get back! If anyone had any ideas or requests comment and let me know! Don't forget to comment and subscribe! Thanks for reading!
Until next time, stay lovely!
-Montana Sky XOXO

Saturday, July 19, 2014

DIY Sea Salt Texturizing Spray

So it is summer and during the summer I hate putting heat on my hair. It's already hot so why contribute to that that? During the summer I generally like to do my hair either natural or wavy. (My natural hair is a curly and wavy mess!) I either go natural or braid my hair the night before and let it out the next day. To me wavy hair is just a cute summery and beachy hairstyle. Now when I decide to go out with my natural hair, my hair never looks quite how I wanted it, it just ends up looking messy and random pieces start to go flat and loose volume. (Of course when I am staying home doing nothing my hair looks amazing cause that's my luck) I tried putting moose and gel in my hair but that did not really work. One day I read about something called sea salt texturizing spray. I googled it and tried to find a little more about it. I noticed that most of them were $7- $15. After I looked at the ingredients that just seemed like too much! I realized I could make this at home for much cheaper! So I experimented a little until i found the best results. Now when I make it, I tend to just start adding everything in without measuring but this past time I tried to measure it out to have a more precise post. There is an extra ingredient that is optional, which is the lemon/ lemon juice. This added ingredient is good for lightening up your hair. Normally my hair gets lighter during the summer but this year my hair looked so dark! If you want to lighten your hair this is a good, natural way to do it! There is one thing to keep in mind if you use the lemon juice. It will only work if you are out in the sun. The mixture of sunlight and lemon will naturally strip your hair of the chemicals making your hair darker. I use this spray anytime I will be outside for a while, even if I am only going for a run. So here are the ingredients for this spray! :

1 Spray bottle filled about half to three fourths of the way with warm water. (This will help dissolve the salt.)
1 1/2 Tablespoons sea salt (more will add more texture and less for less texture)
2 Teaspoons gel
2  Tablespoons leave in conditioner
3 Tablespoons freshly squeezed lemon juice or bottled juice (Optional)

       Now like I said I normally don't measure this out so you can add more or less of anything to your liking! :) The first thing you are going to want to do is find an empty spray bottle. You can either recycle an old spray bottle from an empty hair product or buy one. I had one from Walmart for about $2-$3. Next I took warm tap water and filled it about three fourths of the way up and then added the salt, lemon juice, gel, and leave in conditioner. I like to use a coconut scented one for this to have a beachy smell. Some people use regular conditioner for this product which is totally fine but I usually either only use the leave in conditioner or I will do half and half of the both of them. If want just random wavy natural hair then I take a shower and blow-dry only the roots to add volume. I then take the spray and evenly distribute it through out my hair and running my fingers through it to make sure it is distributed all over your hair. The other thing I love to do with my hair is spray my hair damp with the spray the night before and braid loose braids and go to bed. In the morning I take out the braids and run my fingers through my hair to loosen the waves. If I will be outside and I want the lemon juice to kick in I will lightly spray my hair once again with the spray and I am left with cute summer ready hair! I hope this helps some people out and you enjoyed! Let me know if there are any specific DIY recipe you would like me to try.  Remember to shake the bottle before each use! Thank you for reading!
Until next time, stay lovely!
-Montana Sky XOXO

Friday, July 18, 2014

Update and My Sleep Apnea Surgery!

Hey guys! So I know it's been a while since I have updated, I am very sorry about that! I was out of town for a little longer than I expected, my grandpa had major heart surgery so I had to be there for that! This was very stressful for me and my family especially due to his age! He is 83 so for that reason I was not writing while I was there like I had hoped.  Now I can't blame my lack of posting just on that because I have been back for a while but I was very busy! I had a surgery of my own, jaw surgery. I had upper airway resistance syndrome, which is basically just the prestages of sleep apnea. I found this out in the 7th grade. (I am now currently a senior) So I have known that I needed this surgery for quite a while! They believe that by now I actually did develop sleep apnea. I could take one of two different routes to correct this problem. First I could use a machine every night called a CPAP that would help me breath during the night for the rest of my life. My second choice was to have a corrective surgery which would involve breaking my jaw and bringing the bottom jaw forward which would fix both my awful overbite and my sleep apnea. On top of this he felt is would be best to do something a little extra to my chin. Honestly as stupid as I sound I am not a hundred percent sure what he did! My chin needed to line up with the rest of my face better and if I were to get this surgery he strongly recommended that I get it so we decided to do that as well.  After discussing it with my parents and doctor, we choose the latter so I could just get it over with and it would completely fix my sleep apnea. I got the surgery on July 10th. (Just 5 days before my birthday, not the best way so celebrate!) This will be a long recovery for me because my mouth will be banded shut for 4-6 weeks. Hopefully 4 so I can be un-banded before the start of school, and hopefully in time for my brother's wedding.  I will write a post for my summer wedding hair before his wedding as well!
I have been putting off writing this post for a while now. For the first few days after surgery I was extremely nauseated from the medication. I stopped taking pain meds early on the 4th day. After that I could not be out of bed for long because that would cause pain. I needed to lie down to support my neck and my head. Now I am so happy  to be done with the worst of it! I am ready for it to be completely over and I am getting a little antsy just being stuck at home! Once this is all over I will soon be able to get my braces off which is a huge plus! I have had braces since the 7th grade as well, I would have been able to get them off a long time ago but they were a necessity to the surgery in order to band my mouth shut. As I have previously stated this will be a long road to recovery, but I am no longer in much pain, (mainly just discomfort and my face and jaw gets tired pretty quick) the nausea has past and the puffiness has (mostly) subsided. In the beginning my face was extremely puffy and swollen. When I looked in the mirror I could not believe I was looking at myself! I looked like a chipmunk! Now my face is mostly only bruised and half my face, along with my chin, is numb. I am glad to be feeling good enough to be writing again. I don't know if I have any readers who regularly check my blog or if most of my views are from new people each time who happen to randomly stumble across my blog, but if there was anyone regularly checking, thank you, and again I am so sorry for the delay! I will be posting tomorrow for a DIY hair product!
Until next time, stay lovely! 
-Montana Sky XOXO

Sunday, June 15, 2014

A Short Update and a Quick Fix For Dry Hair!

Hey guys! :) So I am going to go out of town for a week to visit my grandparents so no new posts for a week but, I will be writing while I am gone and will be able to post when I get back! Because of this I have tried to write a little more this week the I normally will. This post will probably be fairly short but, I promise when I get back I will have some good posts!
Naturally I have very dry hair, and living in New Mexico does not help with that matter at all! If I don't take care of my hair it will get very dry and flaky and it makes it look a little dirty. Washing it everyday drys it out even more and makes it worse which creates a problem right there. I noticed my hair was really bad one winter and knew I had to do something to help my scalp and my hair! So I wanted to dedicate a post to being about how to deal with dry hair and help your hair when it begins to look flaky.
The first thing I want to talk about is my hair care while my hair is dry. First off I DON'T wash my hair everyday. That is one of the worst things you can do if you have dry hair, it is not good for your hair or scalp and will dry it out. So I wash it every other, sometimes even skipping a day if I am not going anywhere or if I am just going to be wearing my hair up in some way. (Like today for example) When I wash my hair I use Suave and alternate which one each time because each target specific types of hair care. Currently I am using one for damaged hair, I switch to this one every once and a while to help with any split ends. Once a week I like to use head and shoulders so I can prevent my hair from drying out. When I wash my hair, I use the shampoo and make sure to gently scrub my scalp. Then I use conditioner but I don't use it on the top of my hair, I use it on the lower half of my hair completely avoiding the scalp and leave the conditioner in for a few minutes while I finish my shower. When I get out of the shower and towel dry my hair until it is just damp, I put in a leave in conditioner again avoiding my scalp. I find it best to minimize any hair product being used on the scalp because that can increase the dryness of your hair.
Finally I use a DIY hair treatment that I love! This is perfect for minimizing a dry scalp. All you need is wet hair, oil (I generally use Olive oil and find that works best), honey, and and optional ingredient is lemon (Good if you want to lighten your hair). This is a very simple process but a little messy. This is the only DIY hair treatment I have ever tired and probably the least expensive I have found as well. All you need to do is take a bowl and mix honey and oil. You will use more oil than you will oil and I the amount is dependent on the thickness and length of your hair. You just want enough to cover all of your hair. You can then add lemon if desired. (Either taking a fresh lemon and squeezing the juice out or you can just buy lemon juice, but I think a fresh lemon works the best.) After you have wet hair, either from washing it or with a spray bottle, (You will want it fairly damp) you massage it in to your scalp and put it all through out your head. After you feel it is massaged in sufficiently all you will need to do is bring it in to a scrunched up bun and secure it with a hair tie. I usually let it set for about 30 minutes but you can do it for less but I would not go for too much longer than that. Once the time is up, rinse your hair with cold water (This will make your hair softer) but do not wash your hair only rinse. You should wait a day or 2 before washing your hair, just make SURE all of the oil is out of your hair or it will be VERY greasy. (The first time I did this I made the mistake of not getting it all out and... lets just say my hair looked disgusting for a few days!) If you get it all out you should not have any problems and it will look nice! :)
I really hope you guys found this to be helpful! If you tried this let me know your results or if you have your own method or a method you would like for me to try, leave it in the comments and I will try it! Follow my twitter for updates on the blog! :) https://twitter.com/HairNStyleBlog Until next time, stay lovely!
-Montana Sky XOXO

Friday, June 13, 2014

Overnight Hairstyle #1: Rope Braids

         I am a very lazy person and as much as I love having cute hairstyles and my makeup done, I honestly hate to get ready! On top of that I am NOT a morning person so I can't stand the idea of getting up early to get ready in the morning. Why should we choose between looking good and sleep? Well most of the time I don't. While I do have days where I scrub it and don't really care, and days where I get up early and put more effort in to how I look that day, the majority of the time I get up about 20-30 minutes before I have to leave. There are so many hairstyles that take almost no time in the morning to do. Many you can do the night before which I call overnight hairstyles. These are all cute, quick, and super easy! I do these hairstyles most days and I love them! I'm going to have a series of posts dedicated to overnight, heatless hairstyles. Most of these look great in the summer! So I hope you enjoy and let me know what you think! So for my first heatless post will be one of my favorites! My mom likes to call this the Princess Leia hair because she says that what my hair reminds her of. This style gives both loose curly waves or just deep waves depending on how you style it in the end.


Steps:
Step 1: Brush out hair and split in half on both sides and spray with water. (Or it can be damp from washing your hair)
Step 2: Do a rope braid on each side (split each section in to 2 and wrap or twist them around each other all the way down) then secure with an elastic.
Step 3: Take 1 braid and pull to the top, opposite side of your head and bobby pin it in to place. Repeat on the opposite side and hairspray. (Instead of hair spray you can use mousse before you start your hair)
Step 4: Either go to sleep to let it set or leave in for a few hours.
Step 5: Take out the bobby pins and separate your hair, carefully using your fingers to separate your hair and to style.
 
                      Step 2                               Step 3
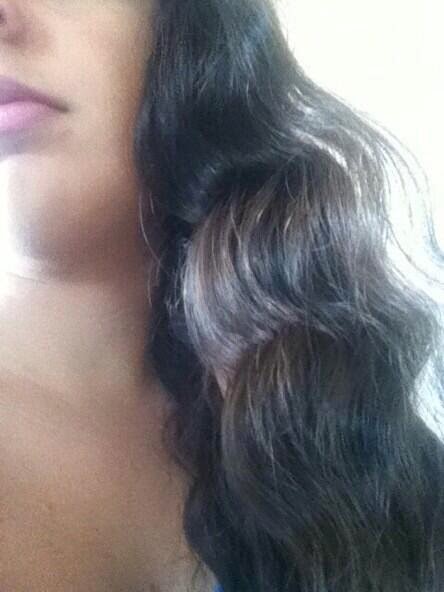
This is what my hair looks like when I first take it out. You can leave it like this if you like the curl, but I like to comb through it much more! :)

For the most part I only do this hairstyle before I go to sleep and just leave the rope braids in but occasionally, I will take a shower in the morning, do the braids, and let them set for a few hours before taking them out. If you like the way the rope braids look you could do them in the morning and leave them in all day and let them out at night if you have plans that night and want a simple, quick, and cute style for your hair that night. If you are pressed for time you can allow it to dry as much as possible while you finish getting ready or for as long as you can keep them in and then finish the drying process with a blow dryer, slowly going over the braids on a low heat. (This is obviously no longer a completely heatless hairstyle if you do it with a blow dryer, but it is using less heat and healthier for your hair than curling it.) If you do not have time to allow any drying and you like this style but don't care about using heat then you can use a straightener. You skip having wet hair and pinning up your braids. Leave the braids down and start by going over them with the straightener. Do not go straight down over them but instead clamp it down over a piece of hair for 10-15 seconds, (Holding for longer or less time depending on the thickness of your hair and how well your hair holds curl/wave) open, move down slightly, and clamp and hold once again going all the way down on both sides, This will create a slightly different texture but will still give you deep curls/waves. 
If you want curlier hair, once you let out the briads, softly comb through and separate with your fingers very carefully so you don't take out the curls. You can also use more products and tighter braids. For more of a deep wave look (my favorite way of wearing this style) you can lightly brush thorough the your hair with a comb once you take the braids out. (The tighter you make the briad, the deeper the wave.) If you want loose wavy curls, don't pin your hair up on top of your head, the braid will loosen a lot and this will create very loose waves when you take them out.

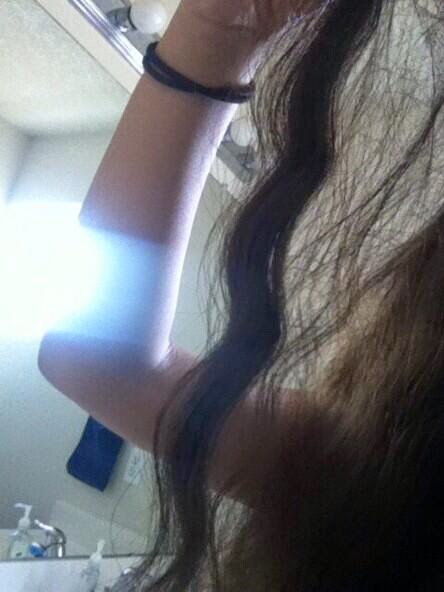
  These are just close ups of the individual pieces. The first is after I separated it and left it alone and the second was taking a comb through it. :)

This is one of my favorite no heat overnight hairstyles. From here you can leave it the way it is or you could do something extra with it. (Half up half down, bows, accessories, etc) I hope you liked this and get as much out of this style as I did! Please let me know what you think and give feedback! 
Until next time, stay lovely!
-Montana Sky XOXO

Tuesday, June 10, 2014

What's In My Bathroom??

       Everyone has those products they can't live without. After all, a girls hair products ARE her best friend! Personally, I don't like to pay a lot of money for a hair product but, at the same time, I want to use something that works!
For the most part I stick to the same brands and my basic hair care is usually the same. So what are my favorite products?
As I have previously mentioned, I don't put heat on my hair too often but when I  do I will NOT use heat without a heat protective spray. I've used many different products that I've liked but recently I tried Tresemme Keratin Smooth heat protectant spray and I fell in love with it! After I use it, (especially when I straighten my hair) my hair is always left soft and shiny and overall it looks very healthy. Although, I love the brand Suave, I did not care too much for their heat protectant spray. It was alright for straightening my hair but I noticed it would cause my hair to not hold curl as well and my hair would fall both easier and quicker and my sister had the same problem. I think this is the only product I have ever had a problem with by Suave.

Next are my leave in's! I use these after I wash my hair and while it's still wet. First is my "Herbal Essence Long Term Relationship Leave-in Split End Protector For Long Hair" I ALWAYS use this after I wash my hair. It is good for repairing/preventing spit ends. After I use it, it leaves my hair feeling soft and smelling amazing. (Mmmm strawberries! (; )Now back to not paying a lot for any product, the next leave-in product is pretty pricey (especially considering the size) but my mom somehow got these products for free at Ulta. (I think they were giving out samples) Anyways the brand is: It's a 10 and is called "Miracle leave-in" One being infused with Keratin and one without. Again I put this in my hair after I wash it and I think it is amazing! First it acts as heat protectant so I can use it for that. It also makes my hair soft, shiny, and silky and overall it makes my hair look and feel great! Now, all that being said, I don't think it is worth the money. A small bottle is about 20 bucks. To me that is way too much especially for such a small bottle. It is very small but I will say it does last a long time. As much as I love this product, I don't plan on buying more unless it is on sell.

For the most part my hair holds both wave and curl quite well even without any product but I do use some on occasion. I probably use hairspray the most. I hate for my hair to be hard or crunchy, I like for it to look and feel soft NOT hard. That is a big factor for me in choosing a good hairspray. I use both Tresemme and Suave. I have a mini bottle of the Tresemme that I keep in my purse in case I need it while I'm not home. For the most part I just use the big bottle of the Tresemme to refill my travel sized bottle and then I use the suave the rest of the time. The Suave hairspray is both bigger and cheaper (Oh and it smells better!(: )but at the same time I do believe that the Tresemme is overall a little bit better of a product and has a stronger hold but all-in-all I like and use both of them. A good product for holding curl is the Suave "Captivating curls". This is basically a gel that you spray in your hair. It is great for holding curl but I don't recommend mixing it with heat. It is great for enhancing natural curl, scrunching, or many of the overnight curly/wavy hairstyles I do. With this product (like many gels or even hairsprays) a little goes a long way! You don't want hard crunchy hair! I have a Finesse mousse and a  Pantene gel for medium to thick hair. It is very rare I use either of these products. Not because the quality of the products are bad (I actually do think they are both good) but I just don't really use mousse or gel to often. I mainly only use mousse in an overnight hairstyle (Future blogs will go in to more detail about my overnight hairstyles).


I pretty much only use Suave shampoo and conditioner. I switch the kind I use every time I buy a new bottle. (For frizzy hair, damaged hair, etc.) I naturally have very dry hair and I live in the desert so I sometimes get flaky and dry hair. To prevent this I wash my hair every other day and use Head and Shoulders once a week.

These were just the products I tend to use the most and my favorites. I do really like all of these products (even the expensive ones if you don't mind paying more for hair products.) If you try anything from this blog let me know! Until next time, stay lovely!
-Montana Sky XOXO

Monday, June 9, 2014

Welcome to my blog!

    I've been wanting to start a blog for quite a while now, but never really knew where to start. I'm a perfectionist so of course this taking a long time for me to write. Writing this was a little hard for me because I had no idea where to start and of course I have no idea how many people will even take the time to read this but, its been something I have wanted to do for a long time now. I love to write and I love anything to do with hair, makeup, and style, so naturally I thought this would be the perfect blog for me. I get bored extremely easily with my hair and clothes so I HAVE to try new things with my hair that is quick, simple and most importantly, cute! I'll be posting once a week or possibly even every other week but there is not really a set day right now. I don't want to be rushed but I want each blog to actually be something worth reading!
    About 6 months ago I did the 30 day no heat challenge. I went a full month with out heat in the hopes my hair would be healthier and longer. (of course 1 month is not going to have a huge impact when you've used heat almost everyday for such a long time!) I loved the many hairstyles I found that were very cute and usually quicker than styling my hair with heat. I decided that the hairstyles were very cute and much healthier for my hair so why not do this from now on instead of just a month. Since then it is rare that I use heat on my hair. (A few times a month usually.) I'm going to be posting many hairstyles, (both with and without heat) DIY hair accessories and hair treatments, along with my favorite hair products.
    Although a lot of this blog IS about hair, I will also be posting about skin care, clothes/shoes/accessories, makeup, DIY projects in the world of fashion and style, and so much more! I really am looking forward to writing more posts and hopefully talking to others! My ultimate goal of this blog is just  that it is helpful to anyone out there who it reading this! So let me know what you think! :) Until next time,
                                     Montana Sky XOXO